Create Custom Sectors In AiM Race Studio
Did you know that you can create custom sectors in AiM Race Studio?
No? Well you can and here is a guide on how you can set them up. For more AiM data tips, check out the podcast episode with AiM guru Matt Romanowski.
What Is Wrong With AiM Race Studio’s Auto Segments Anyway?
If you have an AiM data logger you will likely already be aware of how AiM Race Studio can automatically create sectors for you.
This is a helpful sounding feature but you should tread carefully …
The issue is that you get WAY too many sectors this way. Plus the splits are NOT in the best place. Oh, and the splits will be IN DIFFERENT places for every session you run, even at the same track. This is no good.
If you are asking “Why is that an issue?” to any of the above, then have a quick read of this accompanying article on how to define the right number of well placed split time sectors.
In summary, when you are trying to use split times to analyse your race driver performance, what you need are well placed, meaningful and consistent sectors. Unfortunately, you do not get that with the AiM auto generated splits.
What Is The Purpose Of Split Times?
The aim of using split times is to help you to reliably understand more about what your driver achieved around the lap.
You want to be able to:
- assess your drivers consistency through each part of the track,
- see their progression (or not!) through a session,
- determine what lap time you might be able to achieve.
You are therefore looking to use sector split times to start to identify the key areas for the driver to work on.
Without relevant and reliable sector split times you are making your analysis much harder.
Sadly, whilst a great idea in theory, the automated AiM sectors do not really help you with driver analysis.
Your challenge quickly becomes HOW TO create custom sectors in AiM Race Studio?
If you have ever tried then you may have discovered it is not obvious - at least I did not think it was!
Luckily, it is fairly simple, once you know how.
In the rest of this article I’m going to take you through a worked example on how to create custom sectors in AiM Race Studio.
Then you will be able to work through the same logic with your own data and create your own custom sectors.
Oh, and if you only use AiM Race Studio infrequently BOOKMARK this page.
Your future self will thank you! ?
How To Create Custom Sectors In AiM Race Studio 2
The first thing is just to make sure you have the right settings enabled. If you do not then you will not see any sectors, not even the automated ones …
Step 1: Get Your Settings Correct Via The Measures Graph
This is the measures graph you see when you open AiM Race Studio:
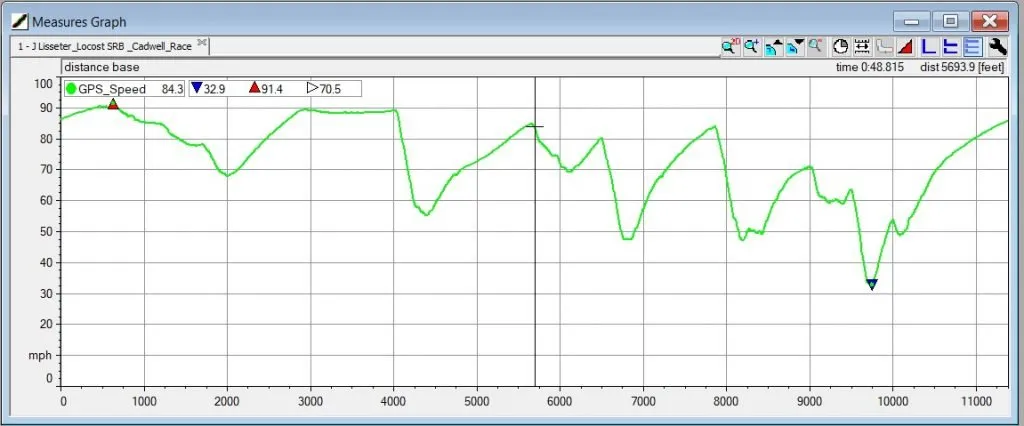
It might be that you see something slightly different, if you have generated a track map before.
That is ok as I’m going to address that below.
For now though you just need to check these settings in the top right:
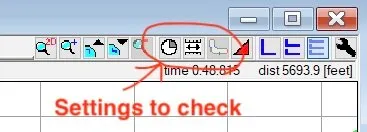
There are two to check:
- Distance/Time
- Snap On/Off
You want to make sure that you have selected Distance and the Snap is On.
The toggle buttons do not tell you their state. Therefore if they look like the image below, then click them again.
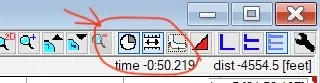
I (think I) understand why AiM does this. The visual difference between the toggle states is extremely subtle though, especially on a small screen.
Unfortunately it is little things like this that can cause you a lot of frustration and waste a lot of your time.
Double check you have these set right before continuing … ?
Step 2: Create A Track Map
To create sectors you need to create a track map.
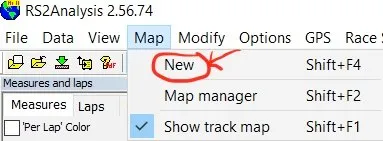
From the menu at the top of the page, click Map —> New like in the image below:
This will open up a new dialogue box similar to this:
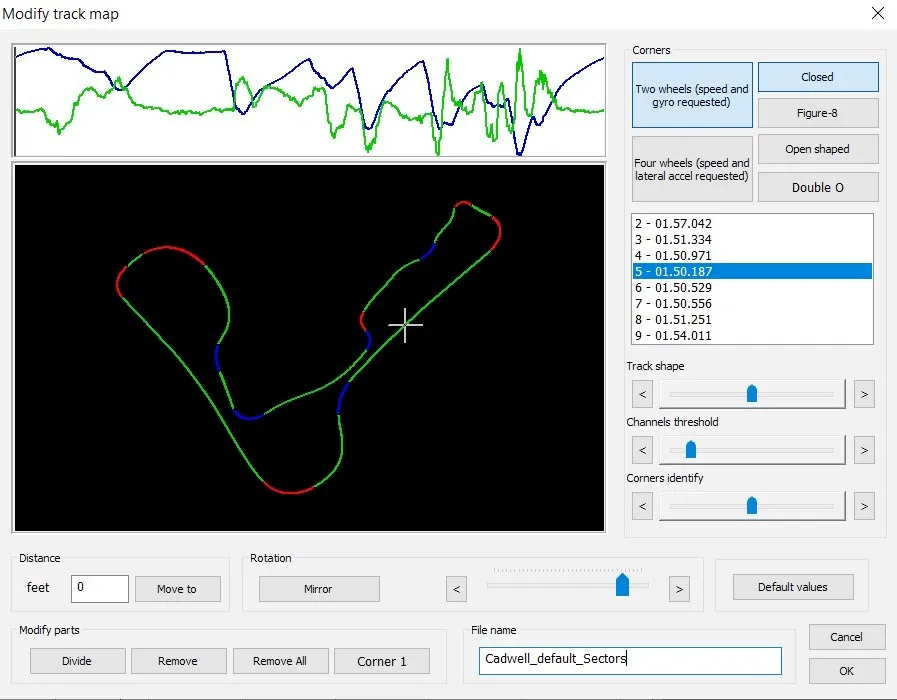
There is a lot going on here.
I’m just going to focus on how to create custom split times but you can manage many things to do with visualising the track here.
As an aside, whilst you might think you can adjust your start finish position here, you cannot. If you find yourself a situation where AiM has cut it in the wrong place here is an article that will help you sort out the correct start finish line position ?
In the image above you can see the splits that AiM has created automatically. They are colour coded for left, right and straight.
You do not want to continue with these but if you did, then when you loaded the “Split Report” you would see a mess something like this:
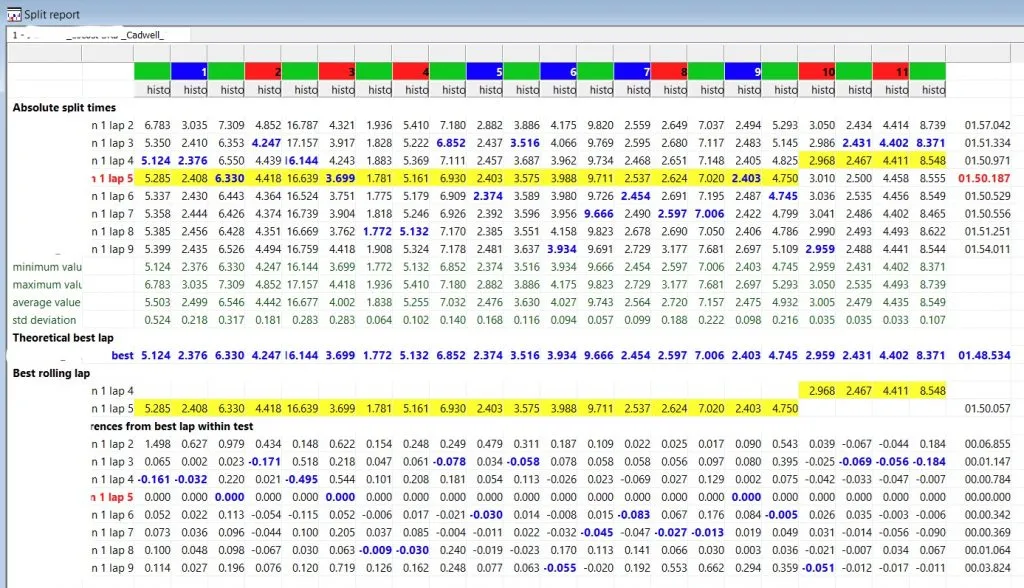
Whilst it might appear useful, this information is next to useless - sorry AiM ?
In my experience you want to create only between 3 and 5 sectors. For why, again read this.
In this example I’m going to create 4 sectors.
Step 3: Create Your First Custom Sector In AiM Race Studio
Firstly you need to clear all the automatically generated sectors.
To do that, click “Remove All” in the bottom left of the Modify Map dialogue:

Second, you need to create your first sector.
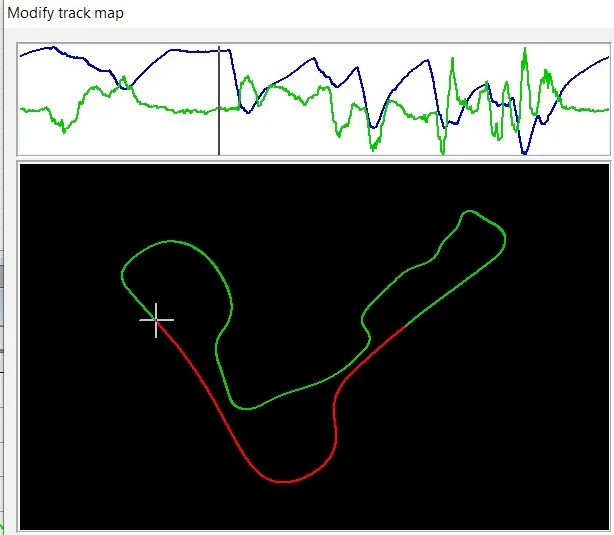
In this example I am going to use the speed trace at the top as my guide.
What I have done is drag my mouse over the speed trace until just before the braking zone.
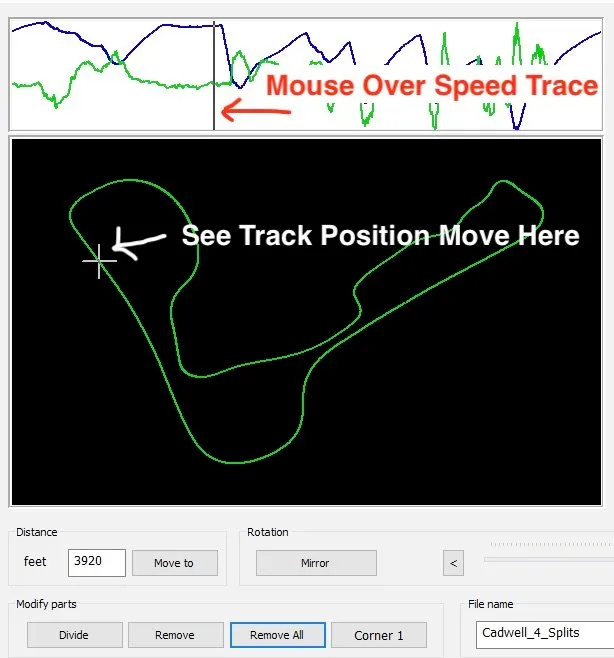
Note that this speed data trace is a bit odd because it is flat for a bit. Your speed trace will more likely be more pointy and therefore easier to find the braking zone.
When you do this you will see that the cursor on the track map also changes. This is a good opportunity to double check whether the spot you are considering is sensible. Sensible meaning not mid corner.
Third. Once you are happy with your position, click “Divide” from the bottom left Modify parts menu:

You should then see something like this on your track map:
Congratulations you have created your first custom sector!
Now to create the others.
Step 4: Creating The Rest Of Your Custom Sectors
To create a total of 4 sectors, you need to divide the track two more times.
Repeat the process from creating your first segment. Use the speed trace to identify the next major braking zone. Use the track map to confirm that the area you are looking at is not mid corner. Then click divide again.
This is what I ended up with:
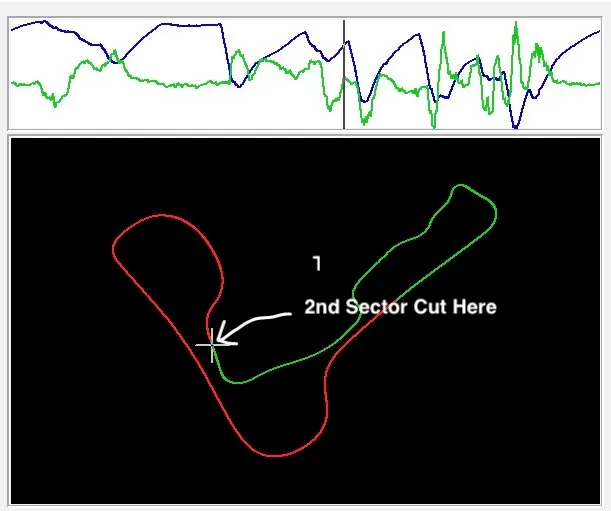
You now have two cuts and three sectors in total.
For reasons I cannot work out, you can see that the second sector is also coloured red.
When I first did this I thought I was doing something wrong. Possibly that it was not dividing or possibly that it had removed my first sector. It was very confusing.
Luckily everything is ok. It is just that the second sector has been coloured the same as the first.
You want to change this and can do that as follows:
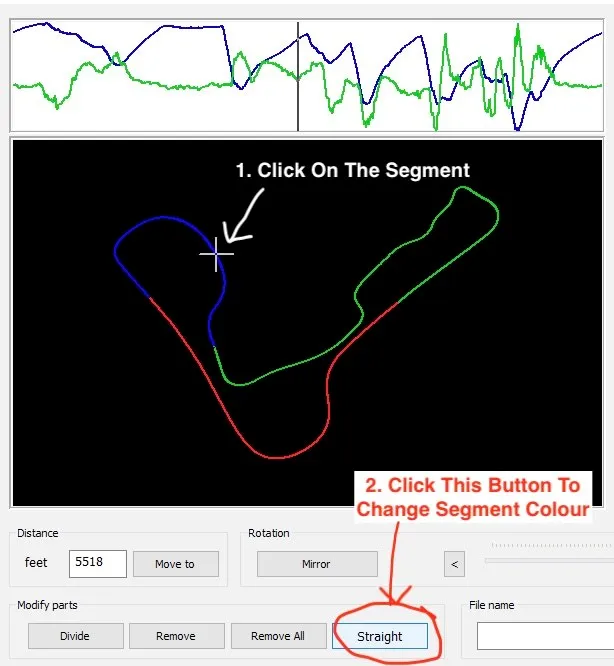
Hopefully the image is clear for you.
What you want to do is click on the segment. Then click on the button in the right of the Modify parts section.
Initially this is called “Corner 1” but if you click the button the name changes and the segment colour. The options are “Corner 1”, “Straight” & “Corner 2”
As you can see in the image above, the second “Divide” did work. Like me, you should now have made two cuts and have 3 sectors in total on your track map.
Repeat the above until you have created all the sectors you require.
Step 5: Save Your New Custom Track Map
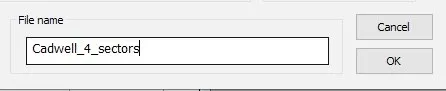
Once you have all your sectors cut and coloured (!) then the last thing to do is save your work.
In the bottom right of the Modify track map dialogue box, fill in the “File name” box and then press OK:
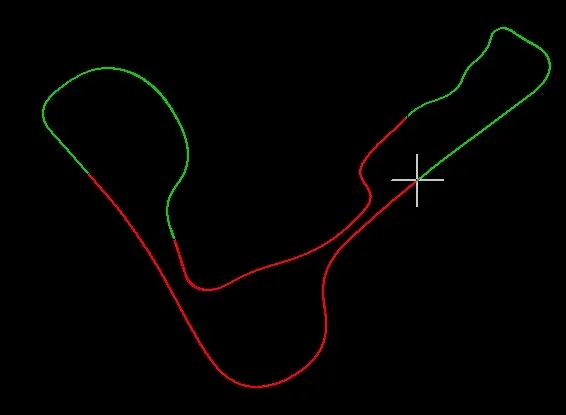
This is what my track map looked like before I saved it:
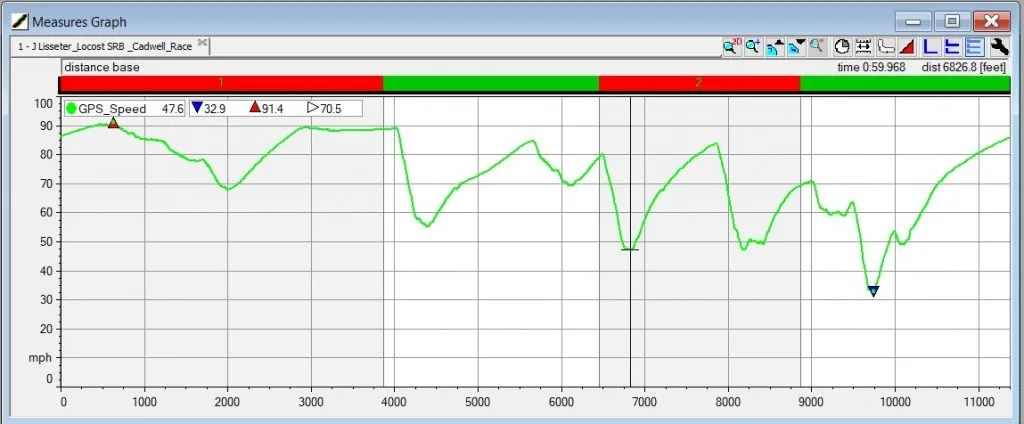
This is the Measures Graph:
And this is what the split report looked like: (Note: I changed the sector colours from the ones below to the above ones after this screen image was taken i.e. the blue one went to green.)
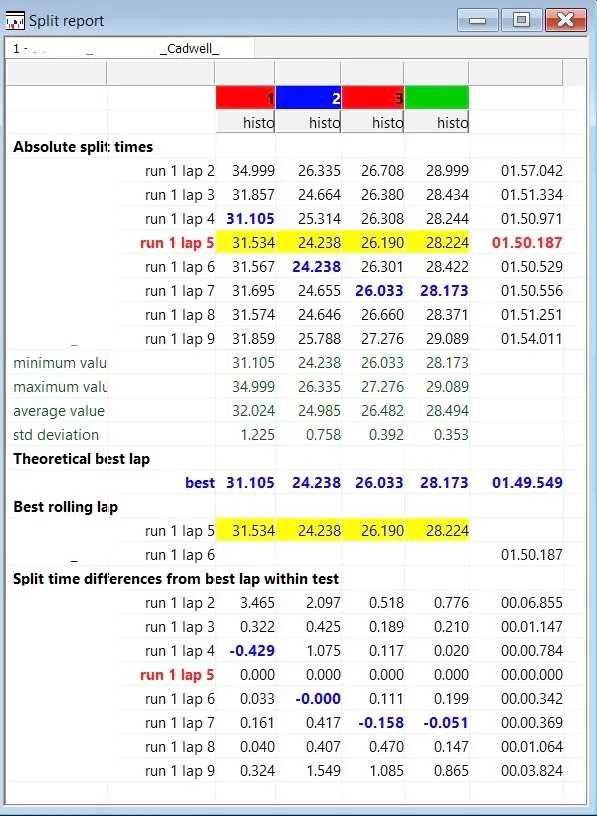
Hopefully you now have something similar.
Interpreting my example, you can see that this driver has opportunity in sector 1.
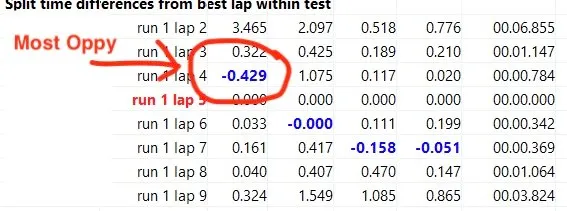
On lap 4 he was nearly 0.5 seconds faster than his fastest lap. What happened? Could he do it again? What else is going on with these splits?
Your challenge now is to try to discover what went on and help the driver form a plan to go faster … (No clue where to start with that? Yes, there is a course for that ?)
In Summary
The AiM auto sector generation system is a lovely concept but in practise of no use to you.
Surprisingly, whilst people are aware of that, they ar e not aware that you can create custom sectors in AiM Race Studio. Hopefully you now know a) you can, and, b) how you can create custom sectors in AiM Race Studio.
Interpreting the 4 sector split report above is much easier and more meaningful. You know that you can rely on the sectors being in the same place every time you want to look at data across drivers or sessions at this track. The sectors are meaningful chunks of the track that aim to encapsulate discrete events for the driver - as best as one can.
You might have a different perspective on where you would cut the splits. The point is that now you know how to create custom sectors where ever you like around the lap in AiM Race Studio.
Check out the further reading suggestions below. Also consider signing-up to my weekly(-ish) newsletter for my latest articles on helping you to lower your lap times, delivered direct to your inbox.
Happy segmenting!
Further Reading
Where do you go after looking at split times? Try the delta-t channel. Learn about it here.
Are you using all your racecars grip? Know how to get this info from your logger? Here’s the article.
No clue where to start with motorsports data analysis? Could this be the course for you?
Whenever you're ready, here are 2 ways I can help you:
Motorsport Skool — The paddock in your pocket. Nearly every course I've ever done, plus unlimited FREE Tech Q&A from our friendly community.
Master Your Tyres course — Go beyond guesswork and become totally self-reliant to tune and drive your tyres. Get more grip, better handling and faster lap times in any conditions.